Install vaping
You always need to install vaping with:
pip install vaping
Error due to outdated setuptools
You may get an error when trying to install:
error in vaping setup command: 'install_requires' must be a string or list of strings containing valid project/version requirement specifiers; Expected ',' or end-of-list in whichcraft==0.4.0 ; python_version<'3.3' at ; python_version<'3.3'
This means you need to update your setuptools, you can do so by running
pip install setuptools -U
Install fping
Most examples require fping to be installed.
To install for CentOS or RHEL, you can get the package from EPEL:
yum install epel-release
yum install fping
To install for Debian Or Ubuntu:
sudo apt-get install fping
Example Standalone Latency
The example config file (from examples/standalone_dns) uses both vodka and graphsrv plugins, so those will need to be installed with:
pip install -U vodka
pip install -U graphsrv
You can still use old graphsrv
We have recently added a major upgrade to graphsrv by switching to a d3.js based frontend.
While this upgrade should be seamless on your end, if you still want to use the old graphsrv for now you can do so by pinning the version to 1.2.0
pip install graphsrv==1.2.0
Clone the github repository to have access to the example configuration files:
git clone git@github.com:20c/vaping.git
cd vaping
Then just start vaping with:
vaping start --home=examples/standalone_dns/ --debug
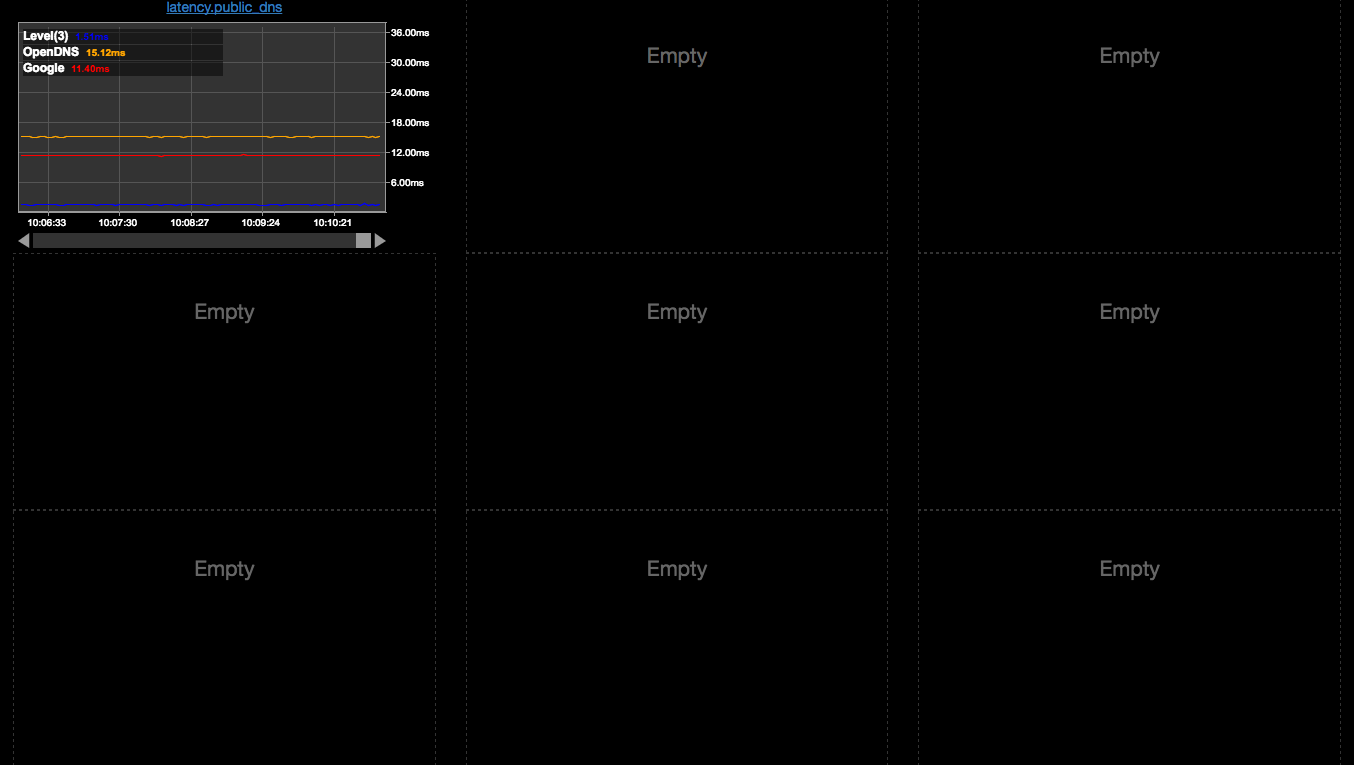
By default it uses a generic layout template and listens on http://0.0.0.0:7021 - going to that in a browser should produce the summary paging which looks like:
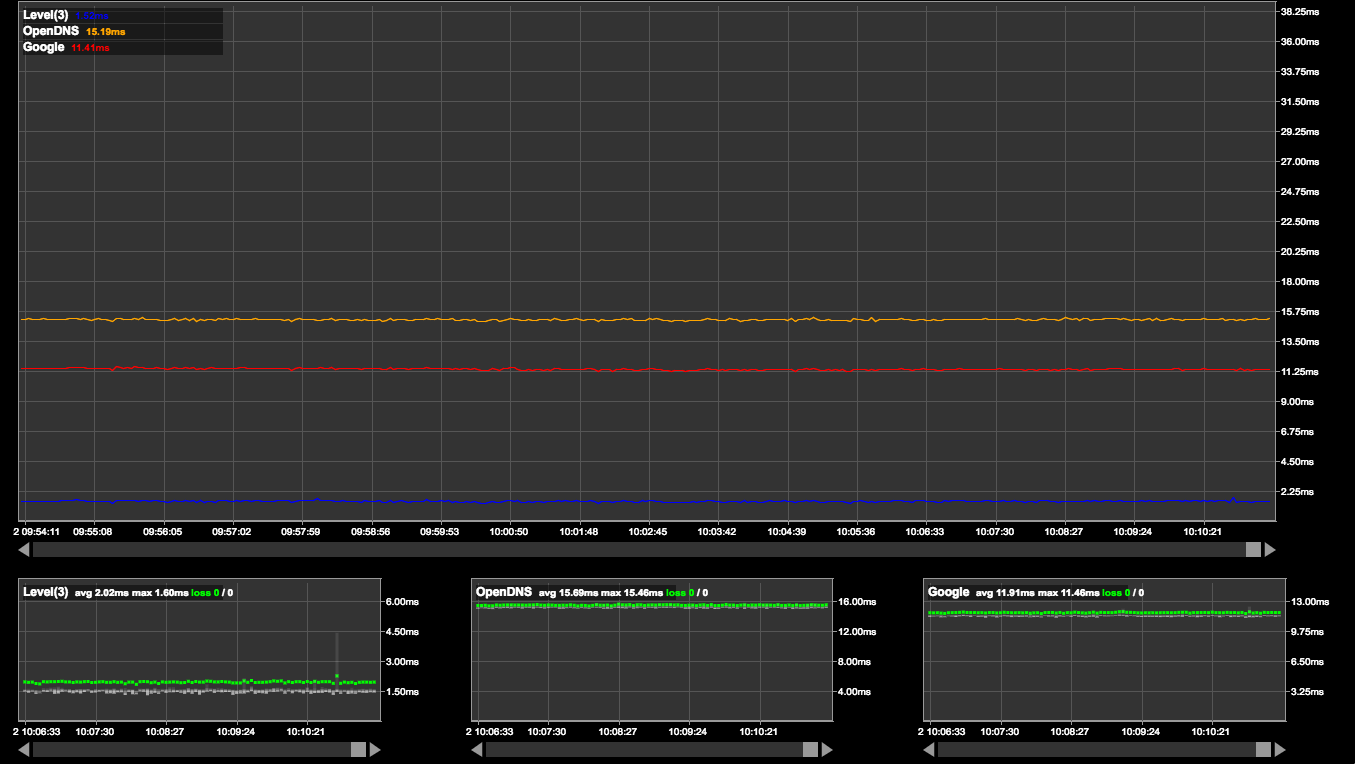
And clicking on the title will navigate to a detail page which looks like:
Below is the config file, common things to change include:
- hosts: probes.public_dns.hosts
- listening address: plugins.vodka.plugins.http.host and port
- fping frequency: plugins.std_fping.count and interval
Config file:
examples/standalone_dns/config.yml:
probes:
  - name: latency
    type: std_fping
    output:
      - vodka

    groups:
      - name: public_dns
        hosts:
          - host: 8.8.8.8
            name: Google
            color: red
          - host: 4.2.2.1
            name: Level(3)
            color: blue
          - host: 208.67.222.222
            name: OpenDNS
            color: orange

plugins:
  - name: std_fping
    type: fping
    count: 10
    interval: 3s
    output:
      - vodka

  - name: vodka
    type: vodka

    data:
      - type: fping
        handlers:
          - type: index
            index: host
          - type: store
            container: list
            limit: 500

    apps:
      graphsrv:
        enabled: true
        graphs:
          multitarget:
            id_field: host
            type: multitarget
            plot_y: avg
            format_y: ms

          smokestack:
            id_field: host
            type: smokestack
            plot_y: avg

    plugins:

      - name: http
        type: flask
        bind: 0.0.0.0:7021
        debug: true
        static_url_path: /static
        server: self
        async: thread
        routes:
          /targets : graphsrv->targets
          /graph_data :
            methods:
              - POST
              - GET
            target: graphsrv->graph_data
          /graph : graphsrv->graph_view
          /overview_read_file : graphsrv->overview_read_file
          /: graphsrv->overview_view


logging:
  version: 1
  formatters:
    simple:
      format: '%(asctime)s - %(name)s - %(levelname)s: %(message)s'
  handlers:
    console:
      class: logging.StreamHandler
      level: DEBUG
      formatter: simple
      stream: ext://sys.stdout

    #file:
    #  class: logging.FileHandler
    #  level: DEBUG
    #  formatter: simple
    #  filename: /home/dev/sandbox/vaping/vaping.log

  loggers:
    vaping:
      level: DEBUG
      handlers:
        - console
        #- file
    vodka:
      level: DEBUG
      handlers:
        - console
        #- file
Example Distributed Latency
The example config file (from examples/distributed_dns) is the same as the standalone one and uses both vodka and graphsrv, so those need to be installed with:
pip install -U vodka
pip install -U graphsrv
Also if you are using zmq to send data between the processes (the default) you will need to install the pyzmq and zmq:
pip install "pyzmq<20"
In some instances you may also be required to install the zmq module alongside it. If you are getting startup issues try adding the following as well:
pip install zmq
The main difference is the collector is running in a separate process than the web server, which allows you to graph things from multiple locations, as well as using another webserver, such as nginx to serve client requests.
To try it out, start vaping with:
vaping start --home=examples/distributed_dns/vaping/ --debug
Standalone vs Distributed Configs
The example config files between standalone and distribtuted setups are not compatible. Running a distributed setup requires running vaping instance(s) and the web server like Gunicorn or UWSGI to present the web elements.
Gunicorn
To test with gunicorn, first install it:
pip install gunicorn
plugins['http'].server is already set to 'gunicorn' in
examples/distributed_dns/vodka/config.yml so run:
export VODKA_HOME=examples/distributed_dns/vodka
gunicorn -b 0.0.0.0:7021 vodka.runners.wsgi:application
You should be able to browse to port 7021 to see the display.
Gunicorn fails to start
If gunicorn fails to start and doesn't tell you why, it's probably some missing
dependency. You can force it to output what it is failing on by passing the
--preload argument to the gunicorn command.
nginx
To test with nginx, install uwsgi:
pip install uwsgi
In examples/distributed_dns/vodka/config.yml change plugins['http'].server
to 'uwsgi' and then configure nginx with an upstream to connect to it.
nginx.conf:
upstream vaping {
    server 127.0.0.1:7021;
}

server {
        location / {
          uwsgi_pass vaping;
          include uwsgi_params;
        }
}
Start the uwsgi process with:
export VODKA_HOME=examples/distributed_dns/vodka
uwsgi -H $VIRTUAL_ENV --socket=0.0.0.0:7026 -w vodka.runners.wsgi:application --enable-threads
You should be able to point your browser to the address nginx is listening on to view it.
Note
If you're running selinux, you'll need to allow nginx to connect to it
with setsebool -P httpd_can_network_connect 1.
Config files:
examples/distributed_dns/vaping/config.yml:
probes:
  - name: latency
    type: std_fping
    output:
      - zmq_vodka

    groups:
      - name: public_dns
        hosts:
          - host: 8.8.8.8
            name: Google
            color: red
          - host: 4.2.2.1
            name: Level(3)
            color: blue
          - host: 208.67.222.222
            name: OpenDNS
            color: orange

plugins:
  - name: std_fping
    type: fping
    count: 10
    interval: 3s

  - name: zmq_vodka
    type: zeromq
    bind: tcp://127.0.0.1:6021


logging:
  version: 1
  formatters:
    simple:
      format: '%(asctime)s - %(name)s - %(levelname)s: %(message)s'
  handlers:
    console:
      class: logging.StreamHandler
      level: DEBUG
      formatter: simple
      stream: ext://sys.stdout

    #file:
    #  class: logging.FileHandler
    #  level: DEBUG
    #  formatter: simple
    #  filename: /home/dev/sandbox/vaping/vaping.log

  loggers:
    vaping:
      level: DEBUG
      handlers:
        - console
        #- file
examples/distributed_dns/vodka/config.yml:
data:
  - type: fping
    handlers:
      - type: index
        index: host
      - type: store
        container: list
        limit: 500

apps:
  graphsrv:
    enabled: true

    # here is where we define host config
    groups:
      latency:
        public_dns:
          8.8.8.8:
            name: Google DNS
            color: red
          4.2.2.1:
            name: Level(3)
            color: blue
          208.67.222.222:
            name: OpenDNS
            color: orange

    graphs:
      multitarget:
        id_field: host
        type: multitarget
        plot_y: avg
        format_y: ms

      smokestack:
        id_field: host
        type: smokestack
        plot_y: avg

plugins:

  # zero mq probe plugin (latency name is important, so it can be
  # routed properly to the similarly named group)
  - name: latency
    type: zeromq_probe
    data: fping
    interval: 1.0
    bind: tcp://127.0.0.1:6021
    async: thread

  - name: http
    type: flask
    bind: 0.0.0.0:7021
    debug: true
    # set this to gunicorn or uwsgi depending on what you want to run with
    server: gunicorn
    async: gevent
    routes:
      /targets : graphsrv->targets
      /graph_data :
        methods:
          - POST
          - GET
        target: graphsrv->graph_data
      /graph : graphsrv->graph_view
      /overview_read_file : graphsrv->overview_read_file
      /: graphsrv->overview_view


logging:
  version: 1
  formatters:
    simple:
      format: '%(asctime)s - %(name)s - %(levelname)s: %(message)s'
  handlers:
    console:
      class: logging.StreamHandler
      level: DEBUG
      formatter: simple
      stream: ext://sys.stdout
  loggers:
    vodka:
      level: DEBUG
      handlers:
        - console
Deep dive into the distributed example
Looking at https://github.com/20c/vaping/tree/master/examples/distributed_dns
There are two directories in there, one called vodka and one called vaping
vodka is the config that is used by the vodka web service (so this would be your web server)
vaping is the config that is used by a vaping process that runs and fping and send the data to vodka
While the standalone variation of vaping can run vodka as a plugin, in this case both are meant to be run in separate processes and can be on separate hosts.
Using the example: to start the web server on one host (using gunicorn to run it):
export VODKA_HOME=examples/distributed_dns/vodka
gunicorn -b 0.0.0.0:7021 vodka.runners.wsgi:application
Then start the vaping that runs fping on a different host:
vaping start --home=examples/distributed_dns/vaping/ --debug
Configuring zmq and groups
Vodka (web server)
In the vodka config, each zeromq connection is instantiated by the zeromq_probe plugin, so it needs one of those for each vaping sending data. Please be aware of https://github.com/20c/vodka/issues/11 because it's a bit counterintuitive.
plugins:
  ...
  # zero mq probe plugin (latency name is important, so it can be
  # routed properly to the similarly named group)
  - name: latency
    type: zeromq_probe
    data: fping
    interval: 1.0
    bind: tcp://127.0.0.1:6021
    async: thread
Additionally, vodka will need to be made aware of any data group that will be sent to it, so each new vaping process will need a new group added in apps.graphsrv.groups
apps:
  graphsrv:
    groups:
      # same name as zeromq_probe instance name above (important!)
      latency:
        public_dns:
          8.8.8.8:
            name: Google DNS
            color: red
          4.2.2.1:
            name: Level(3)
            color: blue
          208.67.222.222:
            name: OpenDNS
            color: orange
Vaping
Likewise, in the vaping config you will need to configure the zmq connection via the zeromq plugin:
plugins:
  ...
  - name: zmq_vodka
    type: zeromq
    bind: tcp://127.0.0.1:6021